 |
| Bear with me. I zinc we're threaded somewhere. |
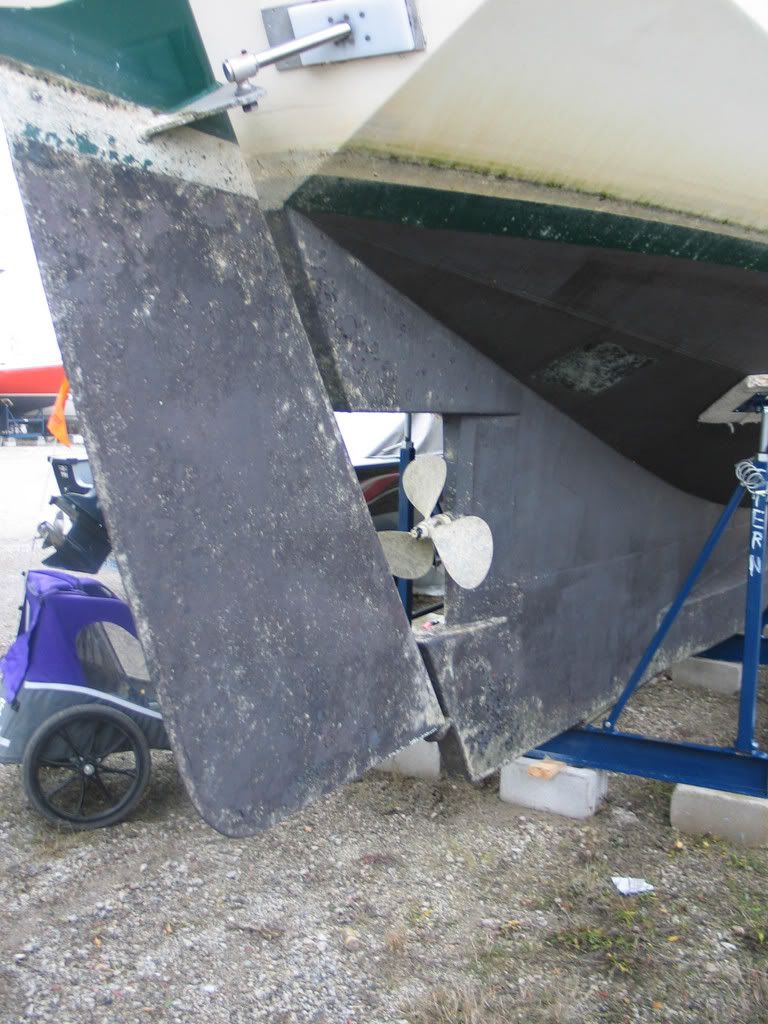
When last we visited the beached mechanic's nightmare known as S/V Alchemy, the rudder had been removed and the old three-blader rudely pulled off its somewhat grubby shaft. In order to satisfy certain concerns about El Propo Grande's blade tip clearance, the new Variprop was put on "finger-tight".
 |
| So very pretty |
 |
| Plenty of clearance all around. Collar shaft zinc optional. |
 | |
| Cutting remarks. |
 |
| Seems straightforward...nom, nom, nom. |
As it turned out, the clearance issue was no issue at all. What loomed next, however, was The Problem of Whip and The Question of Line Cutting. The problem of whip involves the degree to which the shaft runs unsupported beyond the bearing in the stern; even though I could extend it to include a Shaftshark or a similar line cutting device and a 1 3/8th inch thick collar zinc, this would mean unnecessary whip, which is bad for the bearing and bad for everything up to the thrust bearing, the first "hard spot" in the new drive train. See that grey cone on the end of the prop? That's a zinc, and it will suffice. In the equivalent of that zinc space on the shaft (about 1.875 inches at last measurement) will go a Shaft Shark:
The function of this is clear to anyone who has driven over fishing nets, half-sunken line, or even the sturdier sort of plastic bag: If you can chop something to bits before it fouls your precious, precious feathering blades, you should.
 |
| Practically modern art, in my view. |
It does not bear too much self-criticism, however, as that time was spent acquiring skills of both land and sea varieties, restoring my original boat (Valiente) to make it more appealing as a loaner, putting my wife through teachers' college (if not, alas, employment as a teacher as of yet), seeing my son complete several courses of sail instruction and get large enough to stand watch and be more crew and less cargo; and sundry other household and family matters of varying degrees of compulsion and distress.
Did I ever mention I'm the owner of a freelance design and writing business (meaning I find work, I don't go to work) and a landlord (meaning I fix what's broken)? Yeah, boom goes most of the scheduling and good intentions. Let me be a horrible warning to all. Do not attempt without a lottery win and years in the trades.
Irrespective of my whingeing, the important part of this particular post is that I calculated, correctly as it seems, that the new "Variprop, modelle D-107, 4-Blatt, 19 x 15" would fit the space occupied by the the former 18 x 13 'fixed", meaning non-feathering or folding, three-blade. This relatively unworn prop will cleaned up and will become a spare we will bring with us.
 |
| In 2007, space was terrifying. So was the state of the bottom paint. |
(God help the people reading this whose first language isn't English.)
In order to obtain the promised Variprop benefits of "Ruhiger Lauf unter allen Bedingungen, super Schubkraft, keinerlei Vibrationen" (and honestly, who would not want that on a sea-going vessel?), it's going to involve a new shaft cut to the proper length.
That involved the removal of the old shaft. Oh, my aching etc.
 |
| A rare appearance by your humble correspondent working up a sweat in -9C weather. |
 |
| I'm thinking this shaft is 304 SS. I want to keep it for the ship's stripper pole. |
But thanks to our collective extreme manliness and a surplus of clean living, we extracted the metallic devil from its lair and removed the Variprop for a brief rest. The next time that prop is going on, it'll involve LocTite and a future in Seaworld.
 |
| Age has no bearing on it: This device is hardly worn and will be staying in place. |
Of course, prior to the propshaft pull, we needed it to stay in one spot for the critical thrust bearing template construction and placement. In the "Aquadrive" system I've chosen to install, the prop pushes against a thrust bearing tied (by welding and bolts) directly to the hull.
Here's what the model for the fabrication, as created by Capt. Matt, looks like:
 |
| Now with real bevel angles |
 |
| Picture all this cardboard being half-inch thick welded steel and it's all significantly more butch. |
 |
| Showroom quality! |
 |
| Still plenty of space in that bilge, even if you can visualize the waterlift, thrust bearing and wine cellar |
The little pulled-apart clothes pegs you can make out in the stern tube are exactly those. They are the right size to shim the shaft, in the absence of a supporting stuffing box, to more or less the center of the stern tube, which is necessary to align the bearing (the cardboard model), the "yoke" (the large green metal thingie) and the CV coupler (not pictured) with the transmission flange (the business end of the engine). The space between the stern tube and the yoke will contain the packless shaft seal, a clever device that can be seen in the video below. A properly installed PSS will keep ALL water out of the boat, a desirable state of affairs in a steel vessel.
After the construction of the thrust bearing fabrication model, we needed to rough in the engine's eventual position. This was a "one-hander" job, thanks to the engine gantry I built last spring.
 |
| More up and down than a spring-mounted whorehouse demands proper support for one's tackle |
The engine stringers (the fore-and-aft welded girders to which the engine mounts are bolted) needed approximately four inches of height to raise the engine, mounted more or less at the halfway point on the engine mounts, to be at the proper height to couple with the Aquadrive.
 |
| Two by fours haven't been either two or four for some time. All this is "four". |
The mounts themselves are markedly larger than the ones supplied with the engine, and are an integral part of the Aquadrive system. They are called "soft mounts" and this differing type of rubber on the inside has both a vibration dampening effect and allows the engine to rumble with a touch of movement, thanks to the CV (continuously variable) joint attached to the transmission flange.
The result is a much quieter installation in boats made from metal, not generally known for silence underway. And as there is a bit of "give" in the engine's attachment to the boat (but not at the shaft), alignment issues and wear associated with misaligned, as can be the case with solid couplings, is no longer an issue. So, come for the quiet, stay for the reduced wear on the drive train.
 |
| But soft! What mount through yonder lumber pokes? |
This stringer augmentation operation also gives a bit of desirable height and access to the bottom of the engine (the oil sump and various hard to reach places). I feel it's a prudent and tidy practice to slip in a roasting pan or some similarly easily bent metal container with a pad or two of oil-absorbent material. Even the best, newest, and torqued-to-spec engines can shed various fluids, and this is a cheap method of confining whatever mess may occur. And if a failure of greater proportions (a seal failure, for instance) does occur, the oil pad will reveal under what part of the engine the problem is located.
 |
| This gap matches within 2 mm the length of the CV joint and the flange adapter. |
As can be seen above, even before the engine is dropped onto the mounts, which are there for final, "fine" adjustments, we are pretty close. While the Aquadrive can accommodate a fair degree of misalignment, the ideal installation as I understand it is to bolt together the entire set-up to as close to zero-degree, perfect alignment as possible. This means when you are trying to motor off a lee shore in rough chop and the boat is being thrown around, you are going to have all the "play" the Aquadrive system offers, meaning you aren't going to snap something because your hull is flexing or you are getting slapped through sixty degrees of roll.
 |
| Yes, touch up paint and a little Scotchbrite work is required. |
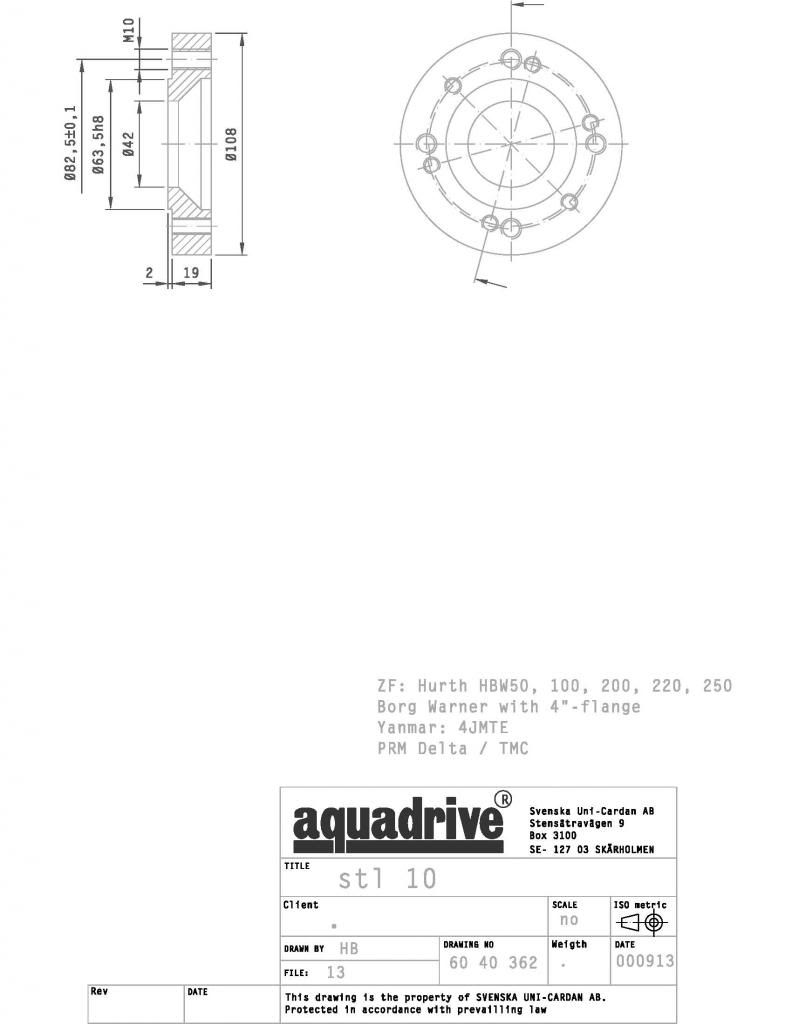
This, however, is a different transmission. It's a ZF 25 hydraulic and that flange is about 75% of the size of the adapter plate (the 3/4" thick piece of Germanic engineering that goes between the transmission and the CV joint) that I have in hand.
So I had to do some measuring. The Beta came with a shaft coupler, so I knew where the holes had to be.
 |
| Digital inches are cool. So are cheap micrometers |
 |
| We'll call that "four point oh". |
"Brent", the patient and helpful staffer at the fine firm that sold me the Aquadrive, suggested I could remachine the existing adapter I have to fit the CV joint and the ZF 25 flange:
 |
| That's a bingo. |
 |
| The holes at 9 and 3 o'clock represent "so". |
German engineering, natürlich, has already thought of this:
 |
| Yeah, I could've made this white space smaller, but I get paid for that sort of thing. |
If it is beyond the fiscal pale, I have a PDF to show a millwright here in Toronto from which to work on the existing adapter.
 |
| More or less how it will look when locked down. |
1) Engine stringer pods are ordered and are being fabricated. DONE 13.02.13
2) Thrust bearing for Aquadrive "yoke" is designed, is ordered and is being fabricated. DONE 13.02.13
3) New prop shaft has been ordered, and is the same dimensionals as the old shaft, but in higher-grade steel. ORDER CONFIRMED 13-02.07
4) Flange adapter is being priced. ORDERED 13.02.07 RECEIVED 13.02.22!
5) Shaftshark will be ordered this week. DONE 13.02.06 RECEIVED 13.02.15
To do in next week:
1) Confirm outstanding orders and find out availability of welder for thrust bearing and stringers, which should be ready in a week or so.
2) Confirm that new exhaust outlet is to be moved from starboard to port side; confirm outlet is to be 51 mm/2 in. OD. Remove old bilge outlet sea cock. Note: Replace oil we used getting the damn prop out.
3) Measure and plan out exhaust system based on Centek or Vetus waterlift. Based on now-known engine height, work out angles for proper rises, etc. and confirm whether a transverse exhaust pipe or supported hose is feasible.
| This is too good an idea not to consider. A siphon break is not needed as one side is always open to the air. Long-time readers will already know my disenchantment with these devices is profound. |
5) The engine must be hoisted high for the welder to get all around access. This means removing or hinging the lowest companionway step to create room to move in, and to cut transverse planking to rest the engine on at pilothouse floor level. Update 130215: Still sourcing the hinges, which need this design at a lower price and not as sturdy. Engine gantry is now modified to raise the crosspiece support about one foot and the floor-level planks are cut and fitted.
A launch is late April is a certainty. A powered launch is looking more likely after the last few days of work. Propositioning, Part 2 is here.


No comments:
Post a Comment